In this post we will look on how to perform a Files Folder migration using the Double-Take Move – 8.2.0 (latest Version).
Assumptions:
Pre Migration Checks:
It is very much important we capture the details from the source server and it needs to validate with the target before the migration initiation.
Below details should be captured for successful migration –
Migration Steps:
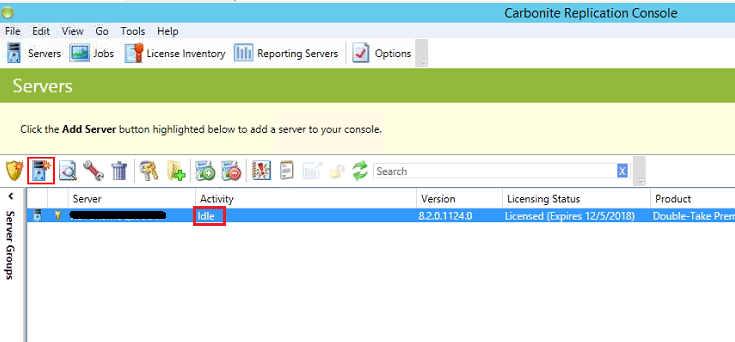
Open the Double-Take Move console and add the source server and target server manually by entering the required credentials.
Right click on your source server and click install to push and install the Double-Take setup to the source server required for migration.
Note: Uncheck the option Reboot automatically if needed to prevent unwanted reboot.
Once the installation is completed the source server in the console will reflecting the status as “IDLE”.

Now select the source and click on Migrate.
Now select the migration type as Files and Folders Migration.
Note: In the replication rules, you can choose to include/exclude files and folders as per the requirement.
In the next screen choose your target server and click next.
In the next screen you will see the Job Options.
Now make appropriate changes to each options as per your requirement in the above options.
Note: Under the Path Mapping, you need to click on the button one to one and you need to map each source disk to the target disk one by one. [This is very important step].
Click Next.
In the summary screen the Double-Take will make a pre-validation of the checklist item. If everything is fine, you will get a green check box across. If any errors found, you need to fix it to proceed.
Now click Finish.
Wait for the synchronization to complete.
Once it completes, you can check the Activity column will display – Protecting and Mirror Status – Idle. Now we are ready for cutover.
Cutover Process:
Once the replication is completed, with Activity as Protecting and Mirror Status as Idle in replication queue, we can start the cutover process.
Take all the application/databases/services to offline state. (Note: It is advised to perform this step prior to migration if we doing cutover immediately)
Double check the replication queue shows 0 bytes pending.
Initiate the Cutover from DT Console. Select the migration job and click Failover/Cutover.
In the Failover/Cutover window select the “Apply data in the Target queue” from the dropdown window and choose cutover.

Once the cutover is completed, the Activity will change to “Failed Over” status.
With this we have successfully migrated the server and performed the cutover.
Proceed with your post migration activities, reboot the server and release the server for testing.
Assumptions:
- A separate server (jump server) with Double-Take console installed and configured.
- Source server is licensed and activated for DT migration.
- Double-Take Move is installed and configured in the source server.
- Only Specific Pre checks have been mentioned here, however we also need to make sure all other generic pre checks are done before the migration.
Pre Migration Checks:
It is very much important we capture the details from the source server and it needs to validate with the target before the migration initiation.
Below details should be captured for successful migration –
- Disk Storage details.
- Number of partitions for each disk.
- Size of each disk must be equal or greater than source server.
- .Net 4.5.1 is installed in the source/target server.
- Target server built with OS/Patches/Updates/Applications installed and pre-configured.
Migration Steps:
Open the Double-Take Move console and add the source server and target server manually by entering the required credentials.
Right click on your source server and click install to push and install the Double-Take setup to the source server required for migration.
Note: Uncheck the option Reboot automatically if needed to prevent unwanted reboot.
Once the installation is completed the source server in the console will reflecting the status as “IDLE”.

Now select the source and click on Migrate.
Now select the migration type as Files and Folders Migration.
Note: In the replication rules, you can choose to include/exclude files and folders as per the requirement.
In the next screen choose your target server and click next.
In the next screen you will see the Job Options.
Now make appropriate changes to each options as per your requirement in the above options.
Note: Under the Path Mapping, you need to click on the button one to one and you need to map each source disk to the target disk one by one. [This is very important step].
Click Next.
In the summary screen the Double-Take will make a pre-validation of the checklist item. If everything is fine, you will get a green check box across. If any errors found, you need to fix it to proceed.
Now click Finish.
Wait for the synchronization to complete.
Once it completes, you can check the Activity column will display – Protecting and Mirror Status – Idle. Now we are ready for cutover.
Cutover Process:
Once the replication is completed, with Activity as Protecting and Mirror Status as Idle in replication queue, we can start the cutover process.
Take all the application/databases/services to offline state. (Note: It is advised to perform this step prior to migration if we doing cutover immediately)
Double check the replication queue shows 0 bytes pending.
Initiate the Cutover from DT Console. Select the migration job and click Failover/Cutover.
In the Failover/Cutover window select the “Apply data in the Target queue” from the dropdown window and choose cutover.
Once the cutover is completed, the Activity will change to “Failed Over” status.
With this we have successfully migrated the server and performed the cutover.
Proceed with your post migration activities, reboot the server and release the server for testing.


