Requirements:
➤ VMware vCenter Standalone Converter 6.1.1 version software downloaded from VMware website Here.
➤ A Windows server with VMware vCenter Standalone Converter Installed. (I am migrating a remote machine in this demo).
➤ Administrator privilege access to physical server. User account should be cached before migration.
➤ Disable SSL in the VMware Converter Server.➤ Administrator privilege access to physical server. User account should be cached before migration.
~~~~~~~~~~~~~~~~~~~~~~~~~~~~~~~~~~~~~~~~~~~~~~~~~~~~~~~~~~~~~~~~~~~~~~~~~~~~~~~~~~~~~~~~~~~~~~~~~~~
Disable SSL:
VMware Converter will by default encrypt the file copy as a security measure. I am choosing to disable the SSL as I am migrating with in the same environment and file copy will be faster if the SSL is disabled.
To disable: Open the folder C:\ProgramData\VMware\VMware vCenter Converter Standalone. Here we can see the file named converter-worker.xml. Edit the file using notepad and scroll down to the section <nfc>. Change true to false in the tag <useSsl> and save the changes. Once the changes are made restart the VMware Converter Worker service for the changes to take effect.
~~~~~~~~~~~~~~~~~~~~~~~~~~~~~~~~~~~~~~~~~~~~~~~~~~~~~~~~~~~~~~~~~~~~~~~~~~~~~~~~~~~~~~~~~~~~~~~~~~~
The Actual Migration:
~~~~~~~~~~~~~~~~~~~~~~~~~~~~~~~~~~~~~~~~~~~~~~~~~~~~~~~~~~~~~~~~~~~~~~~~~~~~~~~~~~~~~~~~~~~~~~~~~~~
This concludes my first post. Please share your comments and suggestion. Thank You.
The Actual Migration:
- Click on Convert Machine in VMware Converter and select remote machine in the dropdown menu.
- Provide the source HostName or IP address of the Physical Server and enter the credentials with administrator access.

- VMware Converter will connect to the source server and installs the VMware Converter Standalone Agent.
- Enter the target Vcenter/ESXi name or IP Address and the credentials.
- Provide the Name for the VM to be created on the target(Usually the HostName of the source).
- Select the target cluster, datastore, host and VM Version.
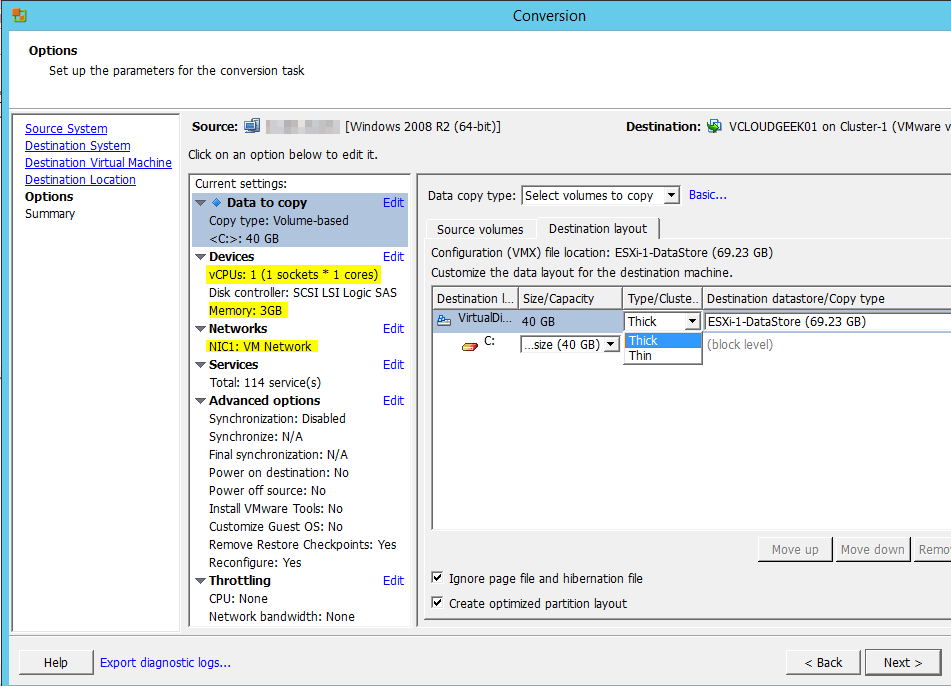
- Here we can edit the target VM properties like HDD size and format, CPU, RAM, Network and services. I am changing the target disk to "Thin Disk" format and leaving the other settings same.
- VMware Converter provides the feature to perform synchronization which is mostly used for converting huge servers.(VMware Converter copies data from source to target VM while the source server is powered on and data on it is being changed by application. This is an initial stage of copying. In the second stage, only the changes made will be copied. Using synchronization, we can achieve reducing application downtime from several hours to 1-2 hours.)
- There is also options to perform post-conversion tasks like Power On target VM, Power Off source server, Install VMware tools and customize guest OS.
- Once all the settings are made review them in the summary screen and submit the job by clicking on Finish.
~~~~~~~~~~~~~~~~~~~~~~~~~~~~~~~~~~~~~~~~~~~~~~~~~~~~~~~~~~~~~~~~~~~~~~~~~~~~~~~~~~~~~~~~~~~~~~~~~~~
This concludes my first post. Please share your comments and suggestion. Thank You.


No comments:
Post a Comment