Tuesday, October 30, 2018

Collecting Host details using the EMC GRAB

The EMC Grab Utility runs a series of host based commands and utilities that collect system information to provide to EMC Support for problem troubleshooting. It collects specific details like server configuration, installed programs, updates/patches, storage and disk information, drivers, event logs etc.

The EMC Grab report creates a zip file. The Windows version of the EMC Grab is the EMC Report.

Windows versions(x86 & x64) download link:
ftp://ftp.emc.com/pub/emcgrab/Windows/

UNIX versions (all flavors) download link:
ftp://ftp.emc.com/pub/emcgrab/Unix/


Steps to run on Windows Server:
1. Download the EMC Grab Utility as per your windows server version.

2. Double click on EMCRPTS_X64_V61.exe

3. Now you can see a command prompt screen running and collecting various system details.

2018-10-25_23-52-51_Fade_Lens


4. Once it completes the collection, the zip file will be saved in the below path:
"C:\Windows\Emcreports\COLLECTION\ZIP"

Steps to run on Linux server:
1. Download the EMC Grab Utility as per your Unix server version.

2. Copy it to the server and extract it.

root@hostname usr] # tar –xvzf emcgrab_linux_v4.8.1.tar  
root@hostname usr] # cd emcgrab


3. Run the script.

root@hostname usr] # ./emcgrab.sh   


DO YOU AGREE TO ACCEPT THE TERMS & CONDITIONS OF THIS LEGAL AGREEMENT (Y/N): Y
1) Please Enter Service Request Number:
2) Please Enter Customer Party Number (Site ID):
3) Please Enter Customer Company Name:
4) Please Enter Customer Contact Name:
5) Please Enter Customer Contact Phone Number:
6) Please Enter your Email Address:
Hostname / OS Info: Your_HostName / Linux

Is the EMC Grab Identification Information Correct (Y/N) : YDo you want to collect SMI-S information (y/n) ? N
Do you want to collect XtremIO Array information (y/n) ? N

Please approve that you verified that the script version is up to date (y/n)? Y

Please submit this file to EMC for Analysis. Thank you
Removing Temporary Files....

4. Verify the output file is created under /usr/emc/outputs OR your specific path you provided.
File Name: HostName_YYYY-MM-DD-HH.MM.SS_Linux_emcgrab_V4.8.1_CC0000000000.tar.gz

5. Now copy the output from the source server using SCP or other tools.


Thursday, October 25, 2018

Convert a Physical Machine to Virtual Machine using VMware vCenter Standalone Converter 6.1.1


Here we are going to migrate a server from Physical to Virtual Server using the VMware vCenter Converter Standalone 6.1.1.

Requirements:

➤  VMware vCenter Standalone Converter 6.1.1 version software downloaded from VMware website Here.
➤  A Windows server with VMware vCenter Standalone Converter Installed. (I am migrating a remote machine in this demo).
➤  Administrator privilege access to physical server. User account should be cached before migration.
➤  Disable SSL in the VMware Converter Server.

~~~~~~~~~~~~~~~~~~~~~~~~~~~~~~~~~~~~~~~~~~~~~~~~~~~~~~~~~~~~~~~~~~~~~~~~~~~~~~~~~~~~~~~~~~~~~~~~~~~

Disable SSL:

VMware Converter will by default encrypt the file copy as a security measure. I am choosing to disable the SSL as I am migrating with in the same environment and file copy will be faster if the SSL is disabled. 

To disable:  Open the folder C:\ProgramData\VMware\VMware vCenter Converter Standalone. Here we can see the file named converter-worker.xml.  Edit the file using notepad and scroll down to the section <nfc>. Change true to false in the tag <useSsl> and save the changes. Once the changes are made restart the VMware Converter Worker service for the changes to take effect.


~~~~~~~~~~~~~~~~~~~~~~~~~~~~~~~~~~~~~~~~~~~~~~~~~~~~~~~~~~~~~~~~~~~~~~~~~~~~~~~~~~~~~~~~~~~~~~~~~~~
The Actual Migration:
  1. Click on Convert Machine in VMware Converter and select remote machine in the dropdown menu.
     
  2. Provide the source HostName or IP address of the Physical Server and enter the credentials with administrator access.


  3. VMware Converter will connect to the source server and installs the VMware Converter Standalone Agent.

  4. Enter the target Vcenter/ESXi name or IP Address and the credentials.
     
  5. Provide the Name for the VM to be created on the target(Usually the HostName of the source).

  6. Select the target cluster, datastore, host and VM Version.
     
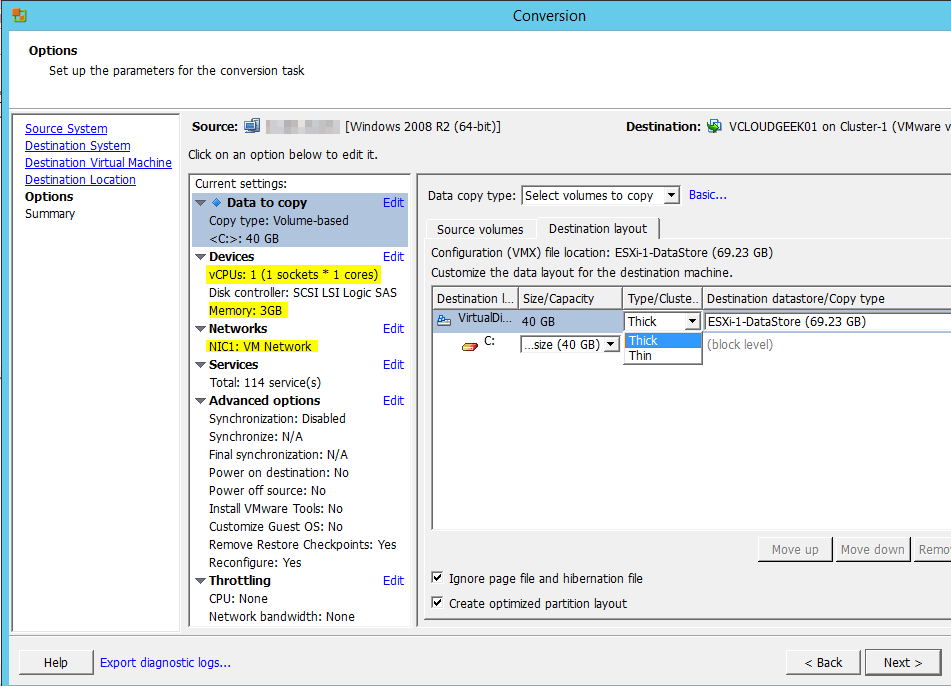
  7. Here we can edit the target VM properties like HDD size and format, CPU, RAM, Network and services. I am changing the target disk to "Thin Disk" format and leaving the other settings same.

  8. VMware Converter provides the feature to perform synchronization which is mostly used for converting huge servers.(VMware Converter copies data from source to target VM while the source server is powered on and data on it is being changed by application. This is an initial stage of copying. In the second stage, only the changes made will be copied. Using synchronization, we can achieve reducing application downtime from several hours to 1-2 hours.)

  9. There is also options to perform post-conversion tasks like Power On target VM, Power Off source server, Install VMware tools and customize guest OS.
     
  10. Once all the settings are made review them in the summary screen and submit the job by clicking on Finish.
Now we can see the Target VM is created on the Destination. Once Migration is completed we can Power on the VM and make post-conversion activities and "You have successfully virtualized the Server".


~~~~~~~~~~~~~~~~~~~~~~~~~~~~~~~~~~~~~~~~~~~~~~~~~~~~~~~~~~~~~~~~~~~~~~~~~~~~~~~~~~~~~~~~~~~~~~~~~~~

This concludes my first post. Please share your comments and suggestion. Thank You.

    Sunday, October 14, 2018

    Install VCSA 6.0 on VMware Workstation


    I am trying to setup a VMware home lab on my computer, I have installed the ESXi 6.0, AD DNS server. Now, I need to install the vCenter Server Appliance. But I don’t want to install it on the ESXi Host. I wanted to install it directly on the VMware Workstation.

    If you try to use the default method, you will not be able to install it directly on Workstation. You will need .ova file to import it into Workstation. The .ova file is available in the ISO, but it’s kind of hidden and we need to find it.

    Requirements:


    Let’s get started:

    1. Download the VCSA 6.0 iso from the above link.

    2. Extract the ISO file using 7-Zip.

    3. Browse to the extracted folder and go to path vcsa\vmware-vcsa and rename it to vmware-vcsa.ova.

    2018-10-12_21-15-58_vcsa


    4. Right click on vmware-vcsa.ova click open with workstation.

    5. Import it to Workstation. “Do Not Power ON”. It’s not time yet. We have to configure the new VM before we can Power ON.

    2018-10-12_21-20-59_Import_Virtual_Machine

    6. Locate where your Virtual Machines files are stored and open the .vmx file with a text editor.

    7. Add the below parameters to the end of VMX file and update the colored parameters as per your network settings.

       guestinfo.cis.appliance.net.addr.family = "ipv4"

       guestinfo.cis.appliance.net.mode = "static"
       guestinfo.cis.appliance.net.addr = "192.168.72.15"
       guestinfo.cis.appliance.net.prefix = "24"
       guestinfo.cis.appliance.net.gateway = "192.168.72.1"
       guestinfo.cis.appliance.net.dns.servers = "192.168.72.2"
       guestinfo.cis.vmdir.password = "Root@123"
       guestinfo.cis.appliance.root.passwd = "Root@123"


    8. Save the .vmx file. Below is the sample of the modified vmx file.

    2018-10-12_21-33-45_CVMsVC-01VC-01.vmx_-_Notepad

    9. Edit the VM setting of the VC-01(my vcenter vm name) and configure the appropriate network. I am running the lab on isolated network, hence I am choosing as per it.

    10. Now Power On the VM and wait for ~10 to 15 mins to complete the installation.

    2018-10-12_22-22-42_Fade_Lens

    11. Login to the vCenter with the below credentials:

    Username: administrator@vsphere.local
    Password: VMware1! (Configured in the vmdir.password)