Tuesday, October 30, 2018

Collecting Host details using the EMC GRAB

The EMC Grab Utility runs a series of host based commands and utilities that collect system information to provide to EMC Support for problem troubleshooting. It collects specific details like server configuration, installed programs, updates/patches, storage and disk information, drivers, event logs etc.

The EMC Grab report creates a zip file. The Windows version of the EMC Grab is the EMC Report.

Windows versions(x86 & x64) download link:
ftp://ftp.emc.com/pub/emcgrab/Windows/

UNIX versions (all flavors) download link:
ftp://ftp.emc.com/pub/emcgrab/Unix/


Steps to run on Windows Server:
1. Download the EMC Grab Utility as per your windows server version.

2. Double click on EMCRPTS_X64_V61.exe

3. Now you can see a command prompt screen running and collecting various system details.

2018-10-25_23-52-51_Fade_Lens


4. Once it completes the collection, the zip file will be saved in the below path:
"C:\Windows\Emcreports\COLLECTION\ZIP"

Steps to run on Linux server:
1. Download the EMC Grab Utility as per your Unix server version.

2. Copy it to the server and extract it.

root@hostname usr] # tar –xvzf emcgrab_linux_v4.8.1.tar  
root@hostname usr] # cd emcgrab


3. Run the script.

root@hostname usr] # ./emcgrab.sh   


DO YOU AGREE TO ACCEPT THE TERMS & CONDITIONS OF THIS LEGAL AGREEMENT (Y/N): Y
1) Please Enter Service Request Number:
2) Please Enter Customer Party Number (Site ID):
3) Please Enter Customer Company Name:
4) Please Enter Customer Contact Name:
5) Please Enter Customer Contact Phone Number:
6) Please Enter your Email Address:
Hostname / OS Info: Your_HostName / Linux

Is the EMC Grab Identification Information Correct (Y/N) : YDo you want to collect SMI-S information (y/n) ? N
Do you want to collect XtremIO Array information (y/n) ? N

Please approve that you verified that the script version is up to date (y/n)? Y

Please submit this file to EMC for Analysis. Thank you
Removing Temporary Files....

4. Verify the output file is created under /usr/emc/outputs OR your specific path you provided.
File Name: HostName_YYYY-MM-DD-HH.MM.SS_Linux_emcgrab_V4.8.1_CC0000000000.tar.gz

5. Now copy the output from the source server using SCP or other tools.


Thursday, October 25, 2018

Convert a Physical Machine to Virtual Machine using VMware vCenter Standalone Converter 6.1.1


Here we are going to migrate a server from Physical to Virtual Server using the VMware vCenter Converter Standalone 6.1.1.

Requirements:

➤  VMware vCenter Standalone Converter 6.1.1 version software downloaded from VMware website Here.
➤  A Windows server with VMware vCenter Standalone Converter Installed. (I am migrating a remote machine in this demo).
➤  Administrator privilege access to physical server. User account should be cached before migration.
➤  Disable SSL in the VMware Converter Server.

~~~~~~~~~~~~~~~~~~~~~~~~~~~~~~~~~~~~~~~~~~~~~~~~~~~~~~~~~~~~~~~~~~~~~~~~~~~~~~~~~~~~~~~~~~~~~~~~~~~

Disable SSL:

VMware Converter will by default encrypt the file copy as a security measure. I am choosing to disable the SSL as I am migrating with in the same environment and file copy will be faster if the SSL is disabled. 

To disable:  Open the folder C:\ProgramData\VMware\VMware vCenter Converter Standalone. Here we can see the file named converter-worker.xml.  Edit the file using notepad and scroll down to the section <nfc>. Change true to false in the tag <useSsl> and save the changes. Once the changes are made restart the VMware Converter Worker service for the changes to take effect.


~~~~~~~~~~~~~~~~~~~~~~~~~~~~~~~~~~~~~~~~~~~~~~~~~~~~~~~~~~~~~~~~~~~~~~~~~~~~~~~~~~~~~~~~~~~~~~~~~~~
The Actual Migration:
  1. Click on Convert Machine in VMware Converter and select remote machine in the dropdown menu.
     
  2. Provide the source HostName or IP address of the Physical Server and enter the credentials with administrator access.


  3. VMware Converter will connect to the source server and installs the VMware Converter Standalone Agent.

  4. Enter the target Vcenter/ESXi name or IP Address and the credentials.
     
  5. Provide the Name for the VM to be created on the target(Usually the HostName of the source).

  6. Select the target cluster, datastore, host and VM Version.
     
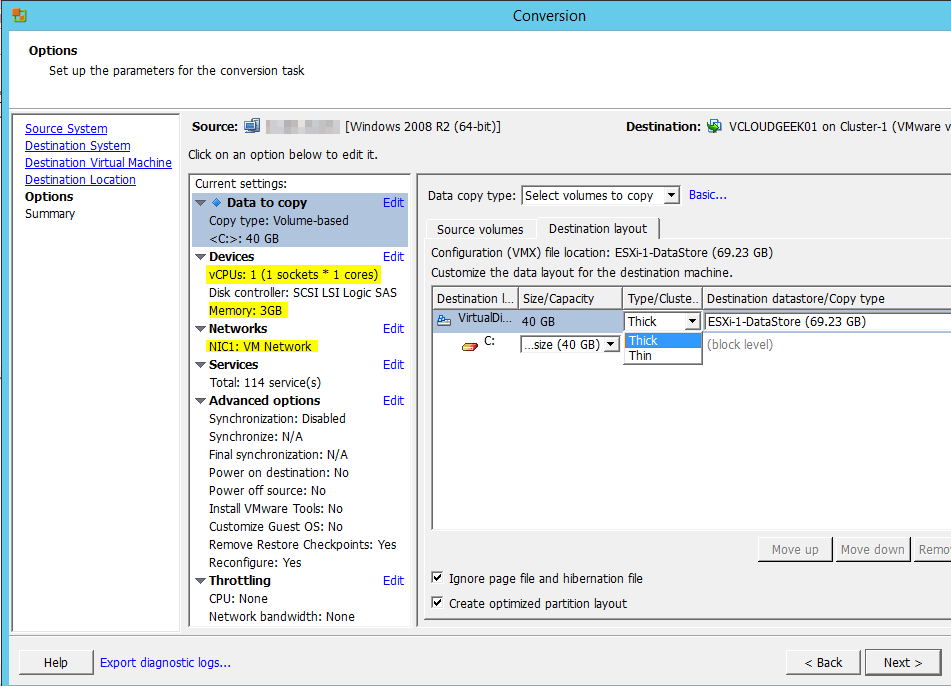
  7. Here we can edit the target VM properties like HDD size and format, CPU, RAM, Network and services. I am changing the target disk to "Thin Disk" format and leaving the other settings same.

  8. VMware Converter provides the feature to perform synchronization which is mostly used for converting huge servers.(VMware Converter copies data from source to target VM while the source server is powered on and data on it is being changed by application. This is an initial stage of copying. In the second stage, only the changes made will be copied. Using synchronization, we can achieve reducing application downtime from several hours to 1-2 hours.)

  9. There is also options to perform post-conversion tasks like Power On target VM, Power Off source server, Install VMware tools and customize guest OS.
     
  10. Once all the settings are made review them in the summary screen and submit the job by clicking on Finish.
Now we can see the Target VM is created on the Destination. Once Migration is completed we can Power on the VM and make post-conversion activities and "You have successfully virtualized the Server".


~~~~~~~~~~~~~~~~~~~~~~~~~~~~~~~~~~~~~~~~~~~~~~~~~~~~~~~~~~~~~~~~~~~~~~~~~~~~~~~~~~~~~~~~~~~~~~~~~~~

This concludes my first post. Please share your comments and suggestion. Thank You.

    Sunday, October 14, 2018

    Install VCSA 6.0 on VMware Workstation


    I am trying to setup a VMware home lab on my computer, I have installed the ESXi 6.0, AD DNS server. Now, I need to install the vCenter Server Appliance. But I don’t want to install it on the ESXi Host. I wanted to install it directly on the VMware Workstation.

    If you try to use the default method, you will not be able to install it directly on Workstation. You will need .ova file to import it into Workstation. The .ova file is available in the ISO, but it’s kind of hidden and we need to find it.

    Requirements:


    Let’s get started:

    1. Download the VCSA 6.0 iso from the above link.

    2. Extract the ISO file using 7-Zip.

    3. Browse to the extracted folder and go to path vcsa\vmware-vcsa and rename it to vmware-vcsa.ova.

    2018-10-12_21-15-58_vcsa


    4. Right click on vmware-vcsa.ova click open with workstation.

    5. Import it to Workstation. “Do Not Power ON”. It’s not time yet. We have to configure the new VM before we can Power ON.

    2018-10-12_21-20-59_Import_Virtual_Machine

    6. Locate where your Virtual Machines files are stored and open the .vmx file with a text editor.

    7. Add the below parameters to the end of VMX file and update the colored parameters as per your network settings.

       guestinfo.cis.appliance.net.addr.family = "ipv4"

       guestinfo.cis.appliance.net.mode = "static"
       guestinfo.cis.appliance.net.addr = "192.168.72.15"
       guestinfo.cis.appliance.net.prefix = "24"
       guestinfo.cis.appliance.net.gateway = "192.168.72.1"
       guestinfo.cis.appliance.net.dns.servers = "192.168.72.2"
       guestinfo.cis.vmdir.password = "Root@123"
       guestinfo.cis.appliance.root.passwd = "Root@123"


    8. Save the .vmx file. Below is the sample of the modified vmx file.

    2018-10-12_21-33-45_CVMsVC-01VC-01.vmx_-_Notepad

    9. Edit the VM setting of the VC-01(my vcenter vm name) and configure the appropriate network. I am running the lab on isolated network, hence I am choosing as per it.

    10. Now Power On the VM and wait for ~10 to 15 mins to complete the installation.

    2018-10-12_22-22-42_Fade_Lens

    11. Login to the vCenter with the below credentials:

    Username: administrator@vsphere.local
    Password: VMware1! (Configured in the vmdir.password)


    Saturday, September 29, 2018

    Install/Uninstall/Validate VMware Tools in CentOS


    VMware Tools is a software that enhances the performance of the virtual machine
    VMware Tools is a software that enhances the performance of the virtual machine. If it is not installed then virtual machine performance is decreased and managing the virtual machine is little difficult.
    It is very easy to install the VMware tools. We are going to take a look of installing it from online and offline mode(CD-Rom).


    Install - Online Mode:

    Use the below command to install VMware on Centos.
    # yum install –y open-vm-tools
    Once installed


    Install - Offline Mode:
    Login in to your virtual machine console with the root account or equivalent.
    1. Mount the VMware tools ISO from the VMware Workstation or vSphere Client VM console.
    This will connect a virtual CD-Rom device with the VMware tools image to your virtual machine.
    # mount /dev/cdrom /media
    2. Change directory to your mount folder, in this case its media.
    # cd /media
    3. Now copy the VMware Tools archive file to temp folder.
    # cp VMwareTools-10.0.6-3560309.tar.gz
    4. Change directory to the temp folder now.
    # cd /tmp
    5. Extract the archive copied to temp folder.
    This will extract the all files to the temp folder.
    # tar –xvzf VMwareTools-10.0.6-3560309.tar.gz 
    6. Now switch to the folder which contains the install/uninstall script.
    # cd vmware-tools-distrib
    7. Now run the script which will install the VMware Tools.
    # ./vmware-tools-install.pl –d
    The VMware tools will install with default selections and you will see a confirmation message on your screen.
    8. Now proceed with the cleanup and reboot the virtual machine.
    # cd /tmp
    # rm –rf vmware-tools-distrib
    # rm –rf VMwareTools-10.0.6-3560309.tar.gz 
    9. Reboot your server to finish the installation.


    Uninstall the VMware Tools:
    Login in to your virtual machine console with the root account or equivalent.
    Run the below command to uninstall –

    # /usr/bin/vmware-uninstall-tools.pl


    Validate the VMware Tools running status:
    # ps -ef | grep vmtools
    root 2740 1 0 Dec09 ? 00:00:42 /usr/sbin/vmtoolsd
    # service vmware-tools status
    vmware-guestd is running

    Friday, August 24, 2018

    Recover Point For VMs - APPLICATION CONSISTENCY WITH KVSS

    RecoverPoint for VMs protects a crucial database VM which requires application consistent point-in-time every day as part of SLA compliance.  We are going to see how to leverage the KVSS to create application consistent bookmarks.
    Log into vSphere web client and navigate to Hosts and Clusters.
    We have replicated Windows Web DB VM beforehand, and we locate it under the name Windows_FE.
    Open the Console Window. Login to Windows_FE server. 
    KVSS - KVSS is free utility which is bundled with every RP4VMs release, it allows to create application consistent bookmarks for Microsoft SQL Server and Exchange. As part of the KVSS installation, a VSS provider is installed which allows KVSS to quiesce the DB and send a bookmark creation request to RP4VMs.
    Execute the KVSS_DB_Bookmark.bat script by double clicking on it. The script would create an application consistent bookmark called proddb_app_consistent for the MSSQL installed on this VM.
    As you can see, KVSS ended successfully and an application consistent bookmark was created successfully as well.  Press any key at the command prompt and return to the vCenter Web Client.
    RP4VM- APPLICATION CONSISTENCY WITH KVSS
    Now, let's perform a test to see the IP configuration is changing on the replica VM. For that purpose, Click on the Test Copy button.
    RP4VM- APPLICATION CONSISTENCY WITH KVSS
    Select NY_Local under copy.  Leave the option to Power on copy VMs during testing enabled as we want the replica VM to power on automatically.
    Click Next.
    RP4VM- APPLICATION CONSISTENCY WITH KVSS
    Select An image from the image list and click Next.
    Scroll down until you see an application consistent bookmark and select it.  Click Next to continue.
    RP4VM- APPLICATION CONSISTENCY WITH KVSS
    Keep the default of Automatically create an isolated network for each consistency group per ESX.  Click Next to continue.
    RP4VM- APPLICATION CONSISTENCY WITH KVSS
    Click on Yes to enable image access. 
    Once the Image Access Progress reaches 100% and the storage status is Logged Access, Image access has been enabled.  Also see that the accessed bookmark is indeed the application consistent bookmark we created using KVSS earlier.
    Click Stop Testing to finish testing or Hide to close the wizard and checkout the DB status on the replica VM.
    RP4VM- APPLICATION CONSISTENCY WITH KVSS
    Click Yes to stop testing.
    We successfully leveraged KVSS (a RP4VMs utility) to create an application-consistent bookmark of our MSSQL DB.
    Creating application-consistent bookmarks:

    KVSS bookmarks are created using the kvss.exe bookmark command.
    The working folder for running KVSS commands is %SystemDriver%/EMCRecoverPointVSSProvider/

    When using KVSS to apply bookmarks:

    • Surround parameter values with quotation marks.
    • You can use the vssadmin list writers command to obtain a list of registered writers on the host virtual machine.
    • You can use the kvss.exe list command to display the components of each of the writers found using the vssadmin list writers command.
    • You can run the kvss.exe set_credentials command once per Windows user to define the ip, user, and password. After doing so, you will not need to type these values again.
    • If they are separated by a space, you can type multiple writers and groups simultaneously.
    • Only the application on which KVSS is run is application consistent, and only when run on the same virtual machine. Best practice is to name the bookmark to contain both the name of the application and the virtual machine.
    • Upgrade the vRPA clusters before upgrading KVSS. An older version of KVSS works with a vRPA cluster running a newer version of RecoverPoint for VMs. A newer version of KVSS does not work with a vRPA cluster running an older version of RecoverPoint for VMs.

    The syntax is as follows:
    kvss.exe bookmark
    bookmark=bookmark_name
      writers=writer_name writer_name
      [groups=group_name group_name]
      [consolidation_policy=never|survive_daily|survive_weekly|
    survive_monthly|always]
      [type=[FULL|COPY]]
    [ip=RecoverPoint_cluster_management_ip_address]
      [user=RecoverPoint_username]
      [password=RecoverPoint password]

    KVSS_DB_Bookmark.Bat:
    C:\EMCRecoverPointVssProvider\kvss.exe bookmark bookmark=”YOUR_BOOKMARK_NAME” writers=”SqlServerWriter”
    pause;

    >>>>>>>>>>>>>>>>>>>>>>>>>>>>>>>>>>>>>>>>>>>>>>>>>>>>>>>>>>>>>>>>>>>>>>>>>>>>>>>>>>>>>>>>>>>>>>>>>>>>>>
    CONCLUSION:
    RecoverPoint for VMs offers the ultimate Virtual Machine protection using a completely virtualized solution that's storage agnostic and is managed using the RecoverPoint for VMs plugin for vCenter vSphere Web Client. RecoverPoint for VMs offers many supported topologies to meet various business requirements and allow users to protect VMs locally and/or remotely from within the vSphere client.

    Recover Point for VMs–Enhanced Network Orchestration

    In this post we will discuss Enhanced Network Orchestration for RecoverPoint for Virtual Machines.
    It is essential to test your recovered VMs with a new IP configuration, to make sure there is full applicative flexibility to run with different IP settings on their DR site.  We are going to see how easy it is to configure RecoverPoint for VMs to automatically set the user-configured IP configuration on a replica VM.
    Log into vSphere web client and navigate to Hosts and Clusters.
    We have replicated Windows Web FrontEnd VM beforehand, checkout its IP configuration: 192.168.1.25 and DNS name: Win-FE.  Navigate to Configure and then RecoverPoint for VMs to see the current protection status
    RP4VM–Enhanced Network Orchestration
    As you can see, the state is Protected and the transfer status is Active. This VM is being replicated by New-York vRPA cluster and the Consistency Group is Win_FE.  Win_FE is a super-important VM, therefore it is protected both locally in NY and remotely to Paris.
    RP4VM–Enhanced Network Orchestration
    To configure the IP configuration of the replica VM, for that, navigate to the RecoverPoint for VMs plugin by clicking on the vCenter home button and then click on RecoverPoint for VMs.
    Navigate to the Protection tab > Consistency Groups sub tab.
    Expand the Win_FE Consistency Group and click on the replica copy Paris_Remote.  Then, click on the Edit VM Network Configurations button.
    RP4VM–Enhanced Network Orchestration
    In the Copy Network Configuration screen, we are going to configure the IP settings of the replica VM.
    For that purpose, expand Network Adapter 1 and click on Get Values From Production near the Network Adapter and Host Name fields in order to retrieve the IP configuration of the production VM.
    Alternatively, scroll all the way to the bottom and click on Get All Values From Production to retrieve all different fields from the production VM.
    RP4VM–Enhanced Network Orchestration
    For the test purpose, we will configure the IP address on the replica VM to be 192.168.1.125 and the hostname to be WIN-FE-REP.  To accomplish that, fill-in Win-FE-REP under Host Name and 192.168.1.125 under IP Address and when done, Click OK
    RP4VM–Enhanced Network Orchestration
    Now, let's perform a test to see the IP configuration is changing on the replica VM. For that purpose, Click on the Test Copy button
    The replica copy to test on is automatically selected, Click Next.
    RP4VM–Enhanced Network Orchestration
    Keep the default selection of the latest image and click Next.
    RP4VM–Enhanced Network Orchestration
    In order to test in a dedicated test network, we would like to leverage the VM Network. Select Use my dedicated network and then select VM Network from the drop down list.  Click Next to continue.
    RP4VM–Enhanced Network Orchestration
    Click Yes to enable image access.  Click Continue.
    Once the Image Access Progress reaches 100% and the storage status is Logged Access, Image access has been enabled.  Click Hide to close the wizard.
    RP4VM–Enhanced Network Orchestration
    Now, let's see the IP configuration of the replica VM. For that purpose, navigate to Hosts and Clusters.
    RP4VM–Enhanced Network Orchestration
    To check that the configured IP settings were applied to the replica VM, Navigate to Windows_FE.copy (replica VM) in Paris ESX cluster, click on the Summary tab and see that the new name is WIN-FE-REP and that the new IP address is 192.168.1.125 as configured in previous steps.
    To check that there is proper connectivity to the replica VM, click on Start and then Run.
    Type ping 192.168.1.125 and Click OK.
    RP4VM–Enhanced Network Orchestration
    Finish Testing by Clicking Finish Testing Copy.
    RP4VM–Enhanced Network Orchestration
    Click OK.  Click Continue.
    This concludes the testing of Enhanced Network Orchestration for RecoverPoint for Virtual Machines.

    Recover Point For VMs–Testing Local Replica of Protected VM


    The following diagram shows a high level overview of one of the RP4VM clusters.
    RP4VM
    In this post we will see how to Test Copy a VM protected by RP4VM:
    • Log into vSphere web client and navigate to Hosts and Clusters.
    • Select the Linux_App (this is our test machine) VM in the inventory list and click Configure and select RecoverPoint for VMs.
    • Now create a bookmark to test the protected copy. Give a name for the bookmark (Test_Bookmark) and accept defaults for other settings.
      image
    • Take note of the list of VMs in the inventory list. At this point rp.Linux_App.copy.shadow is visible. You will see how that changes as you perform a Test Copy on the replica VM.
    • To enable access to the Replica VM, click the Test Copy icon.
    • In the test copy wizard - select the CG name and keep the Power on copy VMs during testing checked.RP4VM–Testing Local Replica of Protected
    • Under select a image option - choose An image from the image list in the dropdown and select the bookmark created.RP4VM–Testing Local Replica of Protected
    • Under Define testing network – select Automatically create an isolated network for each consistency group per ESX where RecoverPoint for VMs will create a private isolated network and assign to the replica VM to it.RP4VM–Testing Local Replica of Protected
    • Click Yes to confirm image access.
    • In the Recovery Action screen you will see that image access is being enabled so wait a few minutes until the Storage status changes to Logged Access.
    • At this point the RecoverPoint for VMs system has applied the selected bookmark to the replica VMDK(s), enabled access to the VMDK, powered up the Linux_App.copy VM (rp.Linux_App.copy.shadow - shadow VM was powered off and renamed).
    • You will now see the list of VMs in the inventory updated and among those VMs, you will see the Linux_App.Copy VM powered on by the RecoverPoint for VMs system.RP4VM–Testing Local Replica of Protected
    • Now you need to access the copy VM and validate the VM is recoverable and validate the integrity by opening console and logging in.RP4VM–Testing Local Replica of Protected
    • After validation, close the console, return to web client.
    • Click Home and select RecoverPoint for VMs/Recovery Activities/select the CG and click next actions and click stop testing.RP4VM–Testing Local Replica of Protected
    • Click on OK to confirm the disable image access process.
    • Click on OK to confirm that all target side applications and VMs are powered off.
    • MONITOR RECOVERY ACTIVITIES - The recovery task will disappear, which indicates that image access has been disabled.
    • Now, you will take a final look at the vCenter inventory list of VMs, and as you might expect the rp.Linux_App.shadow VM (shadow VM) would be powered up and the Linux_App.copy VM will be powered off and removed from the list. In the left navigation pane, click Hosts and Clusters.RP4VM–Testing Local Replica of Protected
    This concludes the testing of protected replica VM using RP4VM.

    Recover Point For VMS Protect VMs – Local and Remote Copy

    In this post we will go over the steps required to protect a VM using RecoverPoint for Virtual Machines.

    Here we are going to protect the VMs with a local copy and remote copy.
    Log into vSphere web client and navigate to Hosts and Clusters.
    Click the Linux_Web (this is our test machine) VM in the inventory list.RP4VM – Local and Remote Copy
    Ensure Summary for the Linux_Web VM is selected, and scroll down the main pane until you see the RecoverPoint for VMs object.
    Click Configure, and then RecoverPoint for VMs.
    Right-click the Linux_Web VM, and then select All RecoverPoint for Virtual Machines > Protect.
    On the first step, you must select whether you want to create a new Consistency Group or add the VM to an existing CG.
    If you want to protect additional VMs, check the box – Protect additional VMs using this group.
    Enter a name for the CGWeb_CG.RP4VM – Local and Remote Copy
    In the Enter a name for the production copy field, type NY_ProdWith the automatic journal datastore registration, there is no need to register a datastore manually. Therefore, keep the defaults, which means that the datastore with the most free space would be used.  Moreover, the minimum production journal size has been reduced to 3GB in RP4VMs 5.2.
    RP4VM – Local and Remote Copy
    Click next.
    CONFIGURE A COPY - In this step you will configure one of our two target copies. You will start by configuring the remote copy.
    In the Enter a name for the new copy field, type Paris_Remote. Select Paris, and then click Next.
    RP4VM – Local and Remote Copy
    There is no need to manually register journal datastores as up to 15 shared datastores are automatically registered.  Click Next.
    Here, you can configure RecoverPoint to automatically create the replica VM at the target cluster or to use an existing one. In this scenario, you want to automatically create the replica VM so leave the Automatically create a new VM copy at the target cluster option selected. The inventory is automatically expanded, as as Paris is the only ESX cluster registered in Paris, it is automatically selected. Click Next.
    RP4VM – Local and Remote Copy
    Select the datastore in which target VM will reside on. Click Next.
    RP4VM – Local and Remote Copy
    In this step, the network port groups to be used when running a failover can be configured. Configuration is done on a per-vNIC basis which is the network adapter on the replica VM. Note that this can be configured through the RP4VMs Web Client Plugin post-protection as well. Click Next.
    RP4VM – Local and Remote Copy
    This step summarizes the selected protection properties. Since you need the Web VM to be protected locally and remotely and you have configured a remote copy up until now, you need to add a local copy in New-York.  Click Add a Copy.
    RP4VM – Local and Remote Copy
    In this step you will configure the second target copy which is the local copy in New-York.  In the Enter a name for the new copy field, type NY_Local.  Select New-York, and then click Next.
    RP4VM – Local and Remote Copy
    In the Configure copy settings, you are going to configure the journal volumes for the local copy in New-York. 
    Leave the Journal size as 10GB as well as automatic selection of datastore. Here you also have the ability to set link policies as you have seen previously in the first section of this lab. You can set the replication type to Asynchronous or Synchronous and you can also specify an RPO in terms of allowed lag based on size, number of writes or time (seconds, minutes..etc). For now, leave this option unchanged.
    Click Next.
    RP4VM – Local and Remote Copy
    You want to automatically create the replica VM so leave the Automatically create a new VM copy at the target cluster option selected.
    New-York is automatically selected as the ESX cluster to run the local replica. Click Next.

    RP4VM – Local and Remote Copy
    Select the ESX01 datastore to store the copy VM.  Click Next.
    RP4VM – Local and Remote Copy
    Configure the failover network for the Replica VM of the local copy. Click Next.
    RP4VM – Local and Remote Copy
    In the Ready to Complete screen, a summary of selections that you made during the wizard are displayed. Take a moment to review the settings, and then click Protect.
    RP4VM – Local and Remote Copy
    The RecoverPoint for VMs system is now creating the replica (.copy) VM as well as auto-provisioning VMDKs for the replica VM and production and target journals.  Depending on what step the system is running, you might see the Linux_Web.copy or rp.Linux_Web.copy.shadow VMs in the inventory list on the left.
    RP4VM – Local and Remote Copy
    This concludes this post on protecting VMs using RP4VM.